Need to get rid of problematic or unnatural backlinks and not sure where to begin? In this helpful how-to, columnist Dave Davies outlines his process for performing a manual backlink audit.

It might be every SEO’s least favorite job: the backlink audit. This is not because the work itself is horrible (though it can be tedious on sites with large link footprints), but because it’s almost always performed when a domain is in trouble.
Whether you’re reading this article because you’re an SEO looking at new strategies or a site owner that has received a link-based penalty, I hope you find the methodology below helpful.
I should note before proceeding that I prefer robust datasets, and so I’ll be using four link datasets in the example. They are:Though I have paid accounts with all of the tools above (except for the Search Console, which is free), each offers a way to get the data for free — either via a trial account or free data for site owners. There are also other link sources you can use, like Spyfu or SEMrush, but the above four combined tend to capture the lion’s share of your backlink data.
Now, let’s begin …
Pulling dataThe first step in the process is to pull the data from the above listed sources. Below, I will outline the process for each platform.
Google Search Console
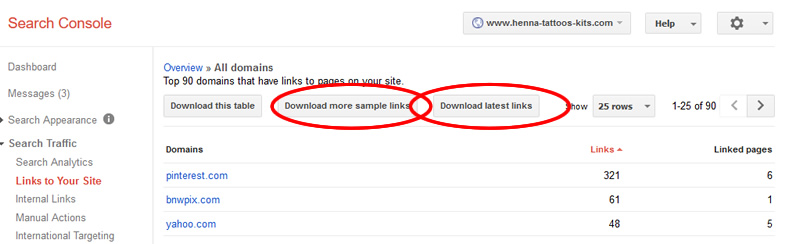
- Once logged in, select the property you want to download the backlinks from.
- In the left navigation, under “Search Traffic,” click “Links to Your Site.”
- Under the Who links the most column, click “More.”
- Click the buttons, “Download more sample links” and “Download latest links,” then save each CSV to a folder.
Majestic
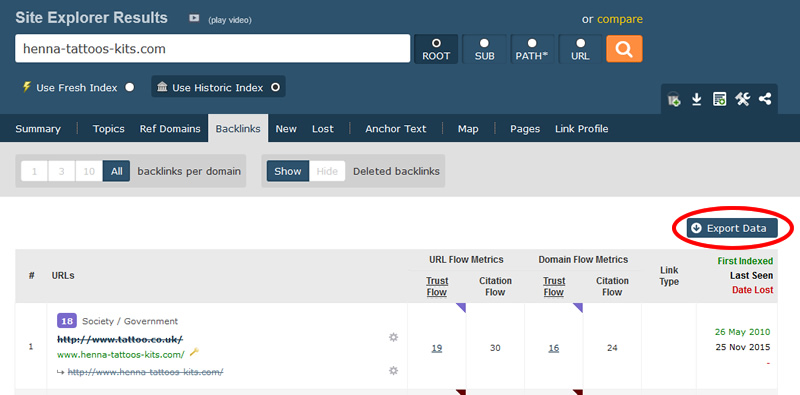
- If you don’t have one, create an account, as you’ll need it to export data. If all you want is access to your own site’s data (which is what we want here), they’ll give you free access to it. You can find more information on that at https://majestic.com/account/register. The rest of these instructions will follow the paid account process, but they are essentially the same.
- Enter your domain into the search box.
- Click the “Backlinks” tab above the results.
- In the options, make sure you have “All” selected for “backlinks per domain” and “Use Historic Index” (rather than “Use Fresh Index”).
- Click “Export Data,” and save the file to the folder created earlier.
- If you have a lot of data, you will be directed to create an “Advanced Report,” where you then need to create a “Domain Report.”
Ahrefs
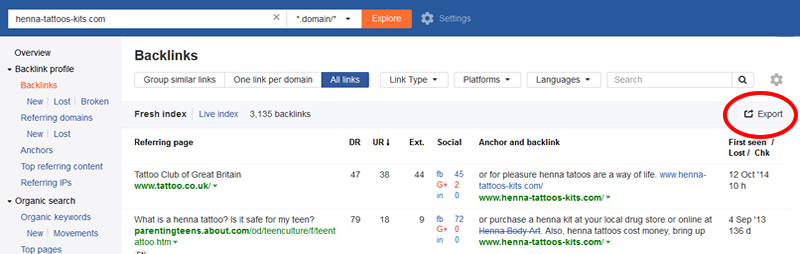
- If you don’t have an account, you can sign up for a free trial.
- Enter your domain into the search box.
- Click “Backlinks” at the top of the left navigation.
- Select “All links” in the options above the results.
- Click “Export,” and save the file to the folder created earlier.
Moz
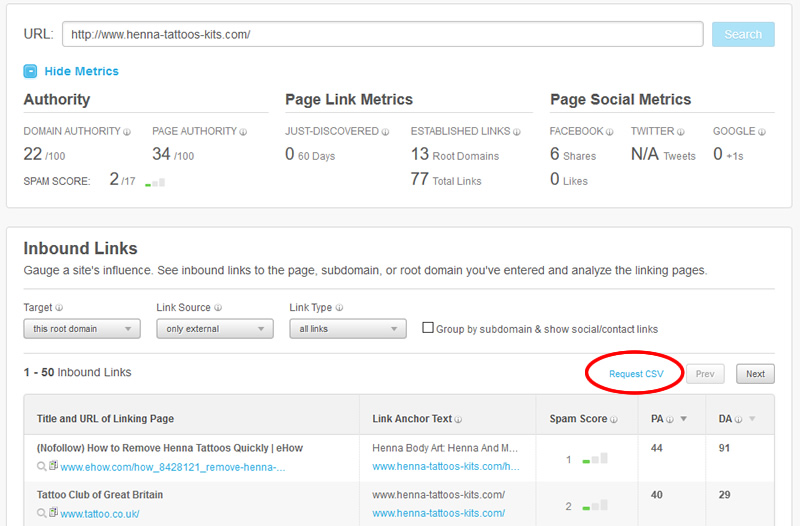
- If you don’t have an account, sign up for a free trial to get complete data.
- From the home page, click “Moz Tools” in the top navigation, then “View all Moz products” in the drop-down.
- Click “Open Site Explorer” on the resulting page.
- Enter your domain into the URL field.
- In the options above the results, select “this root domain” under the target.
- Click “Request CSV,” and when it’s available, save it to the same folder as the other files.
Conditioning your dataNext, we need to condition the data by getting all of the backlinks into one list and filtering out the known duplicates. Each spreadsheet you’ve downloaded is a little different. Here’s what you’re looking at:
The next step is to select all the remaining rows of data and copy them into a Notepad document, then save the document somewhere easily referenced.
And now the fun part…You’ve now got a list of all of your inbound backlinks, but that’s not particularly useful. What we want to do next is to gather unified data for them all. That’s where URL Profiler comes in. For this step, you’ll have to download URL Profiler. Like the other tools I’ve mentioned thus far, URL Profiler has a free trial; so if it’s a one-off, you can stick with the trial.
Once downloaded and installed, there’s a bit of a setup process designed to aid you in a speedy analysis. The first thing you’ll need to do is click the “Accounts” menu, which will bring up the windows to enter your API keys from the various tools discussed previously.
Helpfully, each tab gives you a link to the step-by-step instructions on getting your various API keys, so I won’t cover that here. That leaves me to get to the good part…
You will now be presented with a screen that looks like this:
- Google Search Console. You’ll have two spreadsheets from the Search Console. Open them both, and copy all the URLs in the first column of each to a new spreadsheet, removing the header rows. Both will go into Column A, one after the other.
- Majestic. In the Majestic download, you will find the link source URL in Column B. You will want to copy all of these URLs into the same spreadsheet that you’ve copied the Search Console links into. To do this, you will insert the Majestic data directly below the Search Console data in column A.
- Ahrefs. Ahrefs puts the source URL in column D. Copy all of these URLs to the new spreadsheet, again in Column A, directly below the links you’ve already added.
- Moz. Moz puts the source URL in Column A. Copy all of these URLs again into Column A of your new spreadsheet directly below the other data you have entered.
The next step is to select all the remaining rows of data and copy them into a Notepad document, then save the document somewhere easily referenced.
And now the fun part…You’ve now got a list of all of your inbound backlinks, but that’s not particularly useful. What we want to do next is to gather unified data for them all. That’s where URL Profiler comes in. For this step, you’ll have to download URL Profiler. Like the other tools I’ve mentioned thus far, URL Profiler has a free trial; so if it’s a one-off, you can stick with the trial.
Once downloaded and installed, there’s a bit of a setup process designed to aid you in a speedy analysis. The first thing you’ll need to do is click the “Accounts” menu, which will bring up the windows to enter your API keys from the various tools discussed previously.
Helpfully, each tab gives you a link to the step-by-step instructions on getting your various API keys, so I won’t cover that here. That leaves me to get to the good part…
You will now be presented with a screen that looks like this:
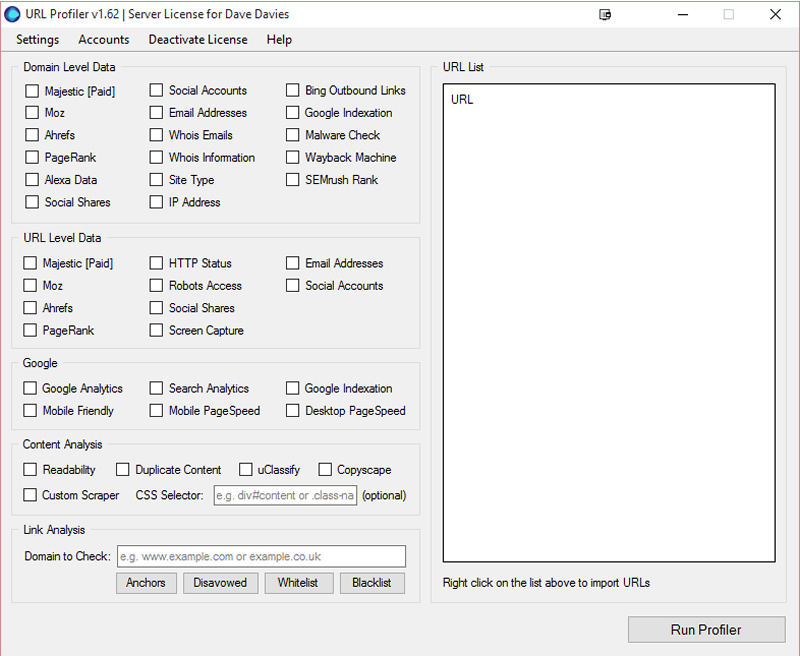
The first step is to right click the large, empty URL List box on the right and select to “Import From File.” From there, choose the Notepad document you created with the links in your spreadsheet above.
You’ll now see a list of all your backlinks in the box, and you’ll need to select all the data that you want to collect from the boxes on the left. The more data you want, the longer it will take, and the more you’ll have to weed though — so you generally only want to select the data relevant to the task at hand. When I am looking for low-quality links, I tend to select the following:
Domain-level data
- Majestic [Paid]
- Moz
- Ahrefs
- Social Shares
- Site Type
- IP Address
- Majestic [Paid]
- Moz
- Ahrefs
- HTTP Status
- Social Shares
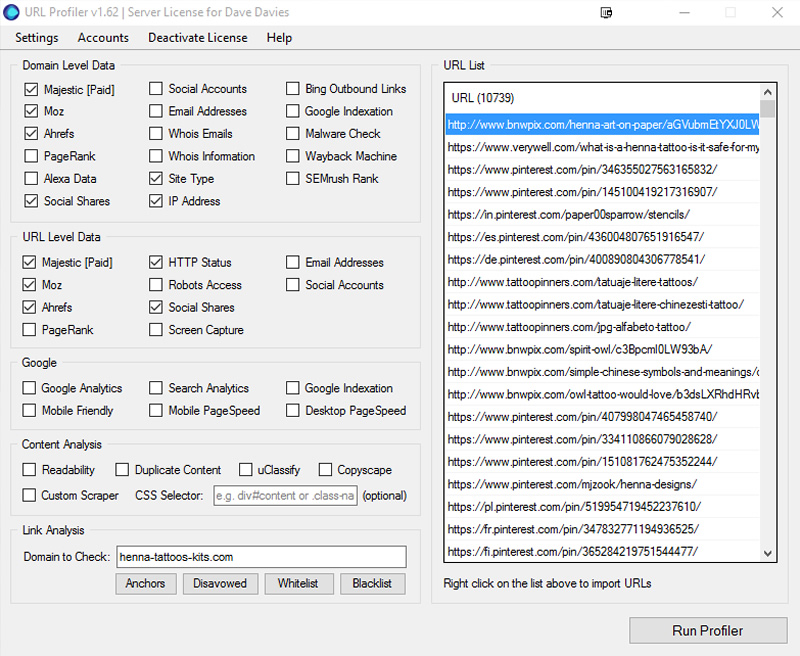
Click “Run Profiler.” At this stage, you can go grab a coffee. Your computer is hard at work on your behalf. If you don’t have a ton of RAM and you have a lot of links to crawl, it can bog things down, so this may require some patience. If you have a lot to do, I recommend running it overnight or on a machine dedicated to the task.
Once it’s completed, you’ll be left with a spreadsheet of your links. This is where combining all of the data from all of the backlink sources and then unifying the information you have on them pays off.
So, let’s move on to the final step…
Performing your backlink auditOnce URL Profiler is done, you can open the spreadsheet with the results. It will look something like this:
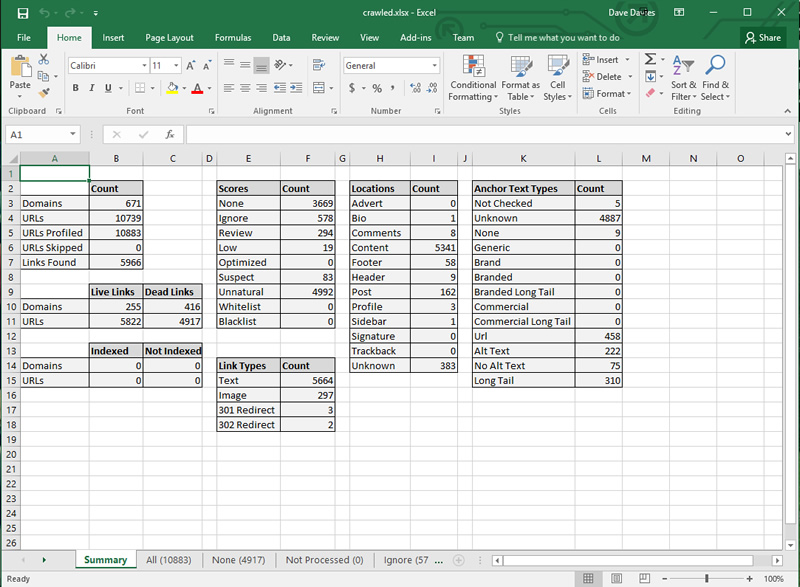
Now, the first thing I tend to do is delete all of the tabs except “All.” I love tools that collect data, but I’m not a fan of automated grading systems. I also like to get a visual, even on the items I will be moving back to similar tabs that I am deleting in this stage (more below).
With those extra tabs removed, you are left with a spreadsheet of all your backlinks and unified data. The next step is to remove the columns you don’t want cluttering your spreadsheet. It’s going to be wide enough as-is without extra columns.
While the columns you select to keep will depend on specifically what you’re looking for (and which data you decided to include), I tend to find the following to be globally helpful:
Source: http://searchengineland.com/performing-manual-backlink-audit-step-step-248276
With those extra tabs removed, you are left with a spreadsheet of all your backlinks and unified data. The next step is to remove the columns you don’t want cluttering your spreadsheet. It’s going to be wide enough as-is without extra columns.
While the columns you select to keep will depend on specifically what you’re looking for (and which data you decided to include), I tend to find the following to be globally helpful:
- URL
- Server Country
- IP Address
- Domains On IP
- HTTP Status Code (and if you don’t know your codes, HTTP Status)
- Site Type
- Link Status
- Link Score
- Target URL
- Anchor Text
- Link Type
- Link Location
- Rel Nofollow
- Domain Majestic CitationFlow
- Domain Majestic TrustFlow
- Domain Mozscape Domain Authority
- Domain Mozscape Page Authority
- Domain Mozscape MozRank
- Domain Mozscape MozTrust
- Domain Ahrefs Rank
- URL Majestic CitationFlow
- URL Majestic TrustFlow
- URL Mozscape Page Authority
- URL Mozscape MozRank
- URL Mozscape MozTrust
- URL Ahrefs Rank
- URL Google Plus Ones
- URL Facebook Likes
- URL Facebook Shares
- URL Facebook Comments
- URL Facebook Total
- URL LinkedIn Shares
- URL Pinterest Pins
- URL Total Shares
Source: http://searchengineland.com/performing-manual-backlink-audit-step-step-248276


 RSS Feed
